| This Information applies to:
- AMX-64
- X-Modem
- Buffalo Airstation
- Mac OSX
Summary
This document explains how to adjust the MTU (Maximum
Transmission Unit) settings to optimise your ADSL Service on Mac
OS 10.1.x and 10.2.x. This document does not cover 10.3.x.
BT Wholesale recommend an MTU setting of 1458 (bytes)
and state that it is best suited to the performance of the ADSL
broadband network.
Instructions
Temporary Change
A temporary change can be made by typing a command
in to the terminal.
 The
terminal utility can be found inside a folder called Utilities located
in the Applications folder on your Hard Drive. Double click the
icon to start the terminal. The
terminal utility can be found inside a folder called Utilities located
in the Applications folder on your Hard Drive. Double click the
icon to start the terminal.
A message similar to the following will be displayed.
| Last
login: Fri Dec 27 11:51:52 on console
Welcome to Darwin!
[Customer's Mac:~] myname% |
The % symbol is a prompt where you can type commands. If your AMX-64
is connected directly via Ethernet type the following command exactly
as shown and press return.
sudo ifconfig en0 mtu 1458
Note: This is en zero not O. If you are connecting
over an Airport Card substitute en0 for en1.
You will be prompted for your password.
To check that it has worked type the following command
and press return.
ifconfig
If it has worked correctly you should see information
similar to the following showing en0 with an mtu value of 1458.
| lo0:
flags=8049<UP,LOOPBACK,RUNNING,MULTICAST> mtu 16384
inet6 ::1 prefixlen 128
inet6 fe80::1%lo0 prefixlen 64 scopeid 0x1
inet 127.0.0.1 netmask 0xff000000
gif0: flags=8010<POINTOPOINT,MULTICAST> mtu 1280
stf0: flags=0<> mtu 1280
en0: flags=8863<UP,BROADCAST,SMART,RUNNING,SIMPLEX,MULTICAST>
mtu 1458
inet6 fe80::203:93ff:fea9:9726%en0 prefixlen 64 scopeid 0x4
inet 213.152.46.178 netmask 0xffffff00 broadcast 0.0.5.178
ether 00:00:00:00:00:00
media: autoselect (10baseT/UTP <half-duplex>) status:
active
supported media: none autoselect 10baseT/UTP <half-duplex>
10baseT/UTP <half-duplex,hw-loopback> 10baseT/UTP <full-duplex>
10baseT/UTP <full-duplex,hw-loopback> 100baseTX <half-duplex>
100baseTX <half-duplex,hw-loopback> 100baseTX <full-duplex>
100baseTX <full-duplex,hw-loopback> |
Permanent change
When satisfied that the MTU adjustment has the desired
affect the change can be made permanent. This involves editing a
system file so be extra careful to make sure that you don't make
any errors.
In the terminal window type the following command.
sudo pico /System/Library/StartupItems/Network/Network
A text editor called pico will open as shown below.
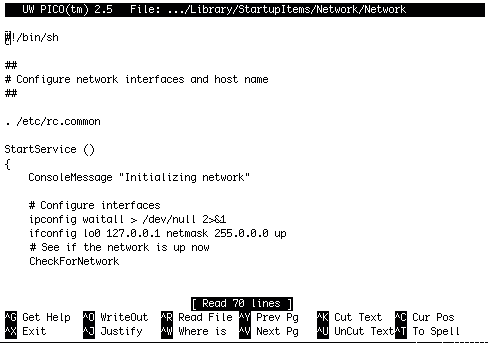
To make the permanent change our MTU command must
be added to this file so that it is applied every time the computer
is switched on. Use the directional arrows on the keyboard to move
the cursor. Change the text as follows.
#!/bin/sh


##
# Configure network interfaces and host name
##


. /etc/rc.common


StartService ()
{
    ConsoleMessage "Initializing network"

    # Configure interfaces
    ipconfig waitall > /dev/null 2>&1
    ifconfig lo0 127.0.0.1 netmask 255.0.0.0 up
    ifconfig en0 mtu 1458
    # See if the network is up now
CheckForNetwork |
When the changes are complete press Control X to exit
pico. When prompted to save press Y for yes. A prompt for file name
to write will then be shown, accept the default by pressing return.
Changes are complete. |